
When users are about to leave your website, exit-intent triggers give you one last chance to keep them engaged. These triggers detect behaviors like moving a mouse toward the top of the browser (on desktops) or switching tabs (on mobile) and can display tailored messages – discounts, forms, or offers – before they go.
Why it matters:
- Reduce cart abandonment with timely discounts.
- Boost email sign-ups with exit popups.
- Lower bounce rates by re-engaging visitors.
With Google Tag Manager (GTM), you can easily set up exit-intent triggers without editing your site’s code. Using Custom HTML tags, you can track user behavior and push an exit_intent event to GTM’s dataLayer. From there, you can display popups or log events in Google Analytics.
Key steps to implement this in GTM:
- Add a JavaScript listener to detect exit intent.
- Create a Custom HTML tag for your popup or offer.
- Set up a Custom Event trigger to connect the two.
Testing in GTM’s Preview Mode ensures everything works smoothly before going live. While this method works best on desktops, mobile alternatives like visibilitychange events are available. Thoughtful targeting and frequency control can make these triggers effective without annoying users.
How to Track Popup Visibility as Events in GA4 using GTM | GTM Course | #24
sbb-itb-2ec70df
What You Need Before Starting
Before you dive into setting up exit-intent triggers, it’s important to have the right tools in place and understand how device compatibility can impact functionality. Here’s what you’ll need to get started.
Required Tools and Access
First, your website needs an active Google Tag Manager (GTM) container, and you’ll need administrative access to manage tags. This includes creating, editing, publishing tags, and importing pre-made GTM recipes. Without these essentials, you won’t be able to implement exit-intent triggers.
The setup relies on Custom HTML tags within GTM to include a JavaScript listener. This listener monitors user behavior, such as mouse movements, and triggers a custom event (e.g., exit_intent) that GTM recognizes. While not mandatory, having a basic understanding of how to push events to the dataLayer can be helpful during this process.
"In Google Tag Manager, implementing an exit intent trigger is fairly simple via a custom HTML tag."
- Julius Fedorovicius, Founder, Analytics Mania
Before publishing any changes, use GTM’s Preview mode to test whether the exit_intent event triggers correctly. This ensures everything works smoothly before going live.
Once your tools are ready, it’s also important to think about how device differences can affect the performance of exit-intent tracking.
Device and Browser Considerations
Exit-intent triggers are most effective on desktop devices because they rely on tracking mouse movements – specifically when the cursor nears the top 10 pixels of the browser window. These scripts can capture exit intent for approximately 75% of desktop users.
"It only works on device with a mouse-pointer. Obviously."
- Jules Stuifbergen, Blogger, Stuifbergen.com
However, mobile devices present a challenge. Since smartphones and tablets rely on touch interfaces, standard exit-intent triggers won’t work. To track mobile users, you’ll need to explore alternative methods, like scroll depth triggers or using the visibilitychange event to detect when users switch tabs or apps.
If you opt for a beforeunload listener as an alternative, keep in mind that it may interfere with browser features like the Back-Forward Cache in Firefox. This could disrupt the user experience, particularly on pages with forms. To prevent issues when firing analytics tags during an exit event, set the transport field to "beacon." This ensures the tracking data is sent even if the page unloads immediately.
How to Set Up Exit-Intent Triggers in Google Tag Manager

How to Set Up Exit-Intent Triggers in Google Tag Manager: 3-Step Process
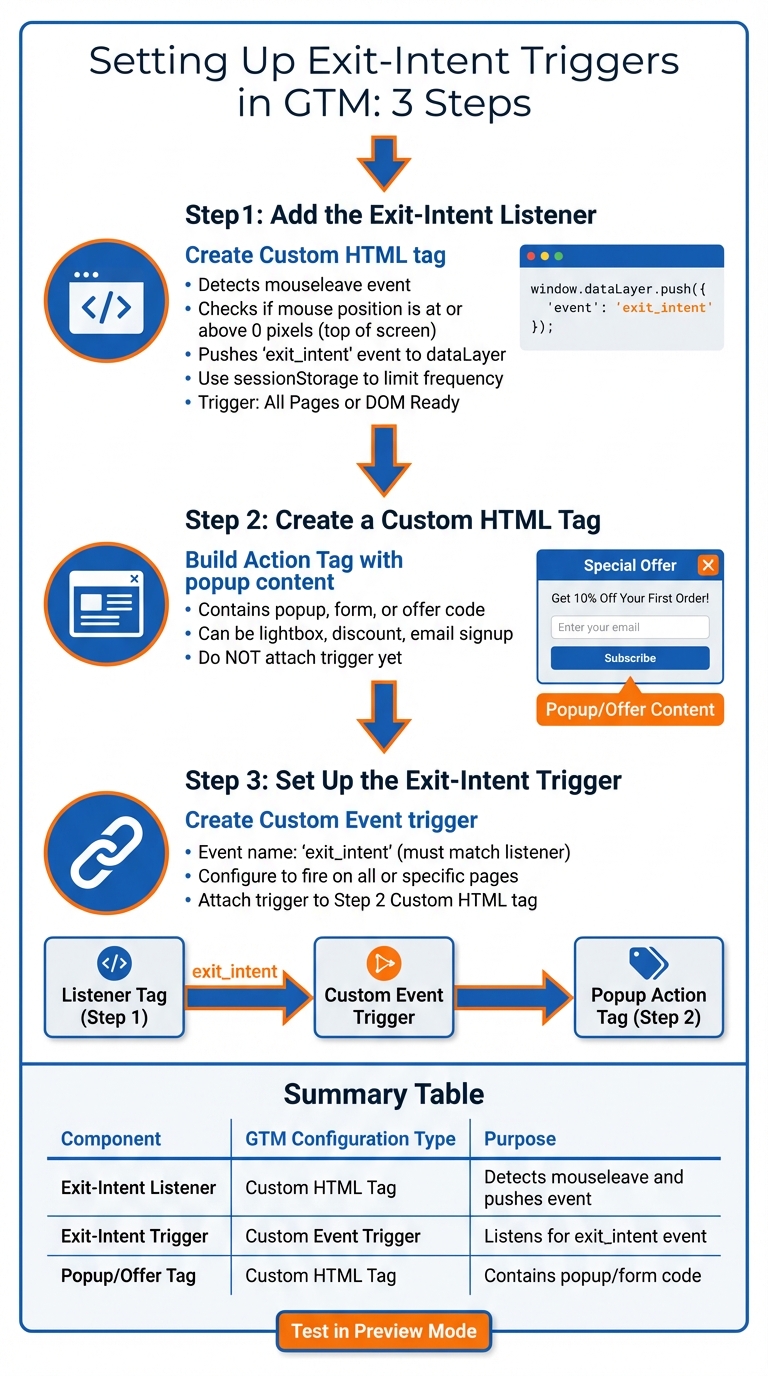
You can track exit-intent behavior in Google Tag Manager (GTM) by combining three key elements: a JavaScript listener, an action tag, and a custom event trigger. Here’s how to configure it step by step.
Step 1: Add the Exit-Intent Listener
Start by creating a Custom HTML tag to detect when a user moves their mouse toward the top of the browser window (where the close button and tabs are located).
In GTM, go to Tags and click New. Choose Custom HTML as the tag type and paste a JavaScript snippet that listens for the mouseleave event. This script checks if the mouse position (evt.clientY) is at or above 0, signaling the user is heading toward the top of the screen.
When this happens, the script pushes an event called exit_intent to the dataLayer:
window.dataLayer.push({ 'event': 'exit_intent' }); To avoid annoying users with repeated popups, use window.sessionStorage to limit how often the listener triggers – such as only once per session or once per minute.
Set the listener to activate on the All Pages or DOM Ready trigger so it works as soon as visitors arrive on your site.
Once this listener is ready, you can move on to creating the tag that will display your popup or offer.
Step 2: Create a Custom HTML Tag
Next, build the Action Tag that contains your popup or conversion element, such as a special offer, email signup form, or lead magnet.
Create another Custom HTML tag in GTM and paste the JavaScript or HTML code for your popup. This could be a lightbox overlay, a discount announcement, or any other element designed to engage users.
At this stage, do not attach a trigger to the tag. You’ll connect it to the exit-intent event in the next step.
Step 3: Set Up the Exit-Intent Trigger
Now, tie everything together by creating a custom event trigger.
In GTM, navigate to Triggers and create a new Custom Event trigger. Enter exit_intent in the "Event name" field – this must match the event name used in your listener script.
You can configure this trigger to fire on all custom events or limit it to specific pages. For instance, you might only want the exit popup to appear on product pages or blog posts, avoiding pages like checkout.
Finally, attach this trigger to the Custom HTML tag from Step 2. Now, when a user moves their mouse toward the top of the browser window, your popup will display – provided the conditions you’ve set are met.
Summary of GTM Components
Here’s a quick reference for how each component works:
| Component | GTM Configuration Type | Purpose |
|---|---|---|
| Exit-Intent Listener | Custom HTML Tag | Detects mouseleave and pushes the exit_intent event to the dataLayer. |
| Exit-Intent Trigger | Custom Event Trigger | Listens for the exit_intent event and fires the action tag. |
| Popup/Offer Tag | Custom HTML Tag | Contains the code for the popup, form, or special offer. |
Before you publish your setup, use GTM’s Preview mode to test it. When you move your mouse to the top of the preview window, you should see the exit_intent event in the summary sidebar. This ensures everything is working as expected.
Best Practices for Exit-Intent Triggers
Control How Often Triggers Fire
Nobody likes being bombarded with popups, so it’s essential to manage how often your exit-intent triggers appear. One way to do this is by using sessionStorage to ensure the popup only fires once per browsing session. Before activating the popup, check for a specific key, such as popup_shown. If the key doesn’t exist, display the popup and set the key using sessionStorage.setItem('popup_shown', 'true').
For a longer-term solution, consider setting a 1st Party Cookie (e.g., exit_popup_seen) with a 30-day expiration. This cookie can act as a safeguard against showing the popup to returning visitors who’ve already seen your offer. You can configure this in Google Tag Manager (GTM) by creating a "1st Party Cookie" variable and using it as an exception in your trigger.
Another smart tactic is to store a timestamp in sessionStorage to track when the popup last appeared. If less than a minute has passed since the last trigger, your script can skip firing the popup. This way, you avoid annoying users who might repeatedly hover near the top of their browser.
Once your triggers are under control, focus on targeting the right pages to maximize their impact.
Target Specific Pages Only
Not every page on your website is a good candidate for exit-intent popups. To make your strategy more effective, limit triggers to high-value pages where user engagement is critical. Avoid interrupting users on checkout, thank-you, or policy pages. Instead, focus on areas like product pages, pricing sections, or blog content where you can add value.
GTM makes it easy to target these pages using the Page Path variable with Regular Expression matching. For example, the expression ^/(pricing|demo) will trigger popups on /pricing and /demo pages without needing separate rules for each. You can also add behavioral conditions – like requiring users to scroll at least 50% of the page – to ensure the popup only appears for visitors who are actively engaged and about to leave.
Design Clear and Useful Popups
A well-designed popup can make all the difference. Keep your message short, to the point, and focused on what the user gets out of it. Whether it’s “Get Your Discount” or “Download Free Guide,” the offer should be immediately clear and compelling. Use a bold, action-oriented call-to-action (CTA) button with high-contrast colors to draw attention without overwhelming the page.
To reduce friction, limit form fields to one or two at most. And always include a visible close button – usually an ‘X’ in the corner – so users can easily exit if they’re not interested. It’s worth noting that traditional mouse-movement triggers only work on desktop devices, so plan accordingly.
| Design Element | Recommendation |
|---|---|
| Message | Short, clear, and focused on value |
| CTA Button | Bold, high-contrast, action-oriented |
| Form Fields | Keep it to 1-2 fields |
| Close Option | Always include a visible ‘X’ button |
Testing and Troubleshooting
Now that your exit-intent trigger is configured, let’s dive into how to test it and resolve any potential issues.
Test with GTM Preview Mode
Once your exit-intent trigger is set up, use GTM Preview Mode to confirm it works as expected. Start by clicking Preview, entering your website’s URL, and selecting Start to launch the Tag Assistant. This creates a debug session that logs all events in real time.
To test your trigger, simulate an exit by moving your mouse pointer out of the browser window. If everything is set up correctly, an exit_intent event should appear in the Event Timeline. Select this event and go to the Tags tab. Your exit-intent popup tag should be listed under Tags Fired. If it’s under Tags Not Fired, click the tag to find out which trigger conditions failed. GTM will display a green checkmark for conditions that passed and a red "X" for those that didn’t.
"Debugging is one of the most important yet commonly overlooked steps in the GTM process. It ensures that every possible user experience scenario is tested and data consistency is validated." – Julius Fedorovicius, Founder, Analytics Mania
In the Variables tab, confirm that values like Page Path or Page URL match your trigger’s criteria exactly. You can also check the Data Layer tab to inspect the raw event object and ensure the exit_intent event is being pushed with the correct key-value pairs. For the most accurate results, always test in an incognito window to avoid interference from browser extensions or cached scripts. If you update your tags or triggers, remember to click Preview again to reload the session, as the debug mode doesn’t update automatically.
If you encounter issues, consult the troubleshooting tips below.
Common Problems and Solutions
If the exit_intent trigger isn’t working as expected, here’s how to address common problems:
| Problem | Likely Cause | Solution |
|---|---|---|
exit_intent event doesn’t appear |
Listener script not firing or JS error | Check the Errors tab in Preview Mode and confirm the Custom HTML listener tag fires on all pages. |
| Tag shows "Not Fired" | Trigger conditions not met | Click the tag in Preview Mode and review which condition has a red "X". |
| Variable is "undefined" | Key name mismatch or timing issue | Verify key names in the Data Layer – they are case-sensitive. |
| Preview Mode won’t connect | Ad blockers or blocked cookies | Disable ad blockers and allow third-party cookies for tagassistant.google.com. |
If you accidentally overwrite the Data Layer using dataLayer = [...] instead of dataLayer.push(), GTM won’t be able to track changes, and the exit_intent event won’t appear. Also, browser extensions like AdBlock or Ghostery can block GTM tags from firing. If changes don’t show up in Preview Mode, perform a hard refresh (Ctrl+Shift+R on Windows or Cmd+Shift+R on Mac) to clear the browser cache and reload updated scripts.
Conclusion
Exit-intent triggers are a smart way to boost conversion rates, and Google Tag Manager (GTM) makes the setup process simple – no need for pricey third-party tools. By identifying when users are about to leave your site, you get one final chance to reduce cart abandonment, capture leads, or encourage engagement.
Setting up exit-intent tracking in GTM involves three key steps: adding the listener, creating a custom HTML tag, and defining the trigger. This approach gives you full control over where and when your popups appear. Plus, focusing on desktop users makes it a cost-effective solution that doesn’t require heavy developer involvement.
"Exit-popups can be very valuable if used correctly." – Jules Stuifbergen, Web Consultant
But setting it up is just the beginning – ongoing optimization is what really makes exit-intent triggers shine. Fine-tune the trigger behavior by using tools like sessionStorage to limit how often popups appear, targeting high-priority pages, or combining triggers with scroll depth to engage users who are more invested in your content. Keep in mind that exit-intent tracking is primarily effective for desktop users.
Continuous refinement is essential to separate genuine exit intent from routine actions, like switching tabs or typing in the search bar. With proper setup and regular adjustments, exit-intent triggers can drive engagement and conversions while keeping the user experience positive. By following these steps in GTM, you can make the most of this powerful tool.
FAQs
How do I track exit intent on mobile?
Tracking exit intent on mobile requires a different approach compared to desktop because mobile devices don’t have a cursor to track. Instead, focus on user behaviors like quick upward scrolling or a noticeable spike in scroll speed. These actions often signal that a user is preparing to leave the page. By identifying these patterns, you can trigger an exit intent action to grab their attention and re-engage them before they leave.
How can I stop the exit popup from showing too often?
To avoid overwhelming users with repeated exit popups, implement frequency capping using cookies or local storage. This allows you to track whether a user has already encountered the popup and stops it from appearing again within a specific period, like 24 hours. Adjust your Google Tag Manager trigger to check this data before activating the popup. This approach creates a smoother user experience and minimizes frustration.
How do I send the exit_intent event to GA4 in GTM?
To set up the exit_intent event in Google Analytics 4 (GA4) using Google Tag Manager (GTM), follow these steps:
- Create an Exit-Intent Trigger: Set up a trigger in GTM that detects when a user is about to leave your website. This could involve monitoring actions like the mouse cursor leaving the browser window.
- Configure a GA4 Event Tag: Add a new GA4 Event tag in GTM. Use a descriptive event name like
exit_intentto track this behavior. - Link the Tag to the Trigger: Assign the exit-intent trigger you created to this GA4 Event tag, ensuring the tag fires when the trigger conditions are met.
- Test in Preview Mode: Before publishing, use GTM’s preview mode to verify that the event fires as expected when users exhibit exit-intent behavior.
Once everything works properly in testing, publish your changes to make the setup live.